Summary:
The point of this document is to show you how to tweak windows 8 border sizes.
Before making any changes to registry keys, Microsoft strongly recommends the registry be backed-up
NOTE: If you don't want to modify Registry yourself, download following ready-made Registry script which is located at the bottom of this page, this will do the whole task automatically for you.
Action:
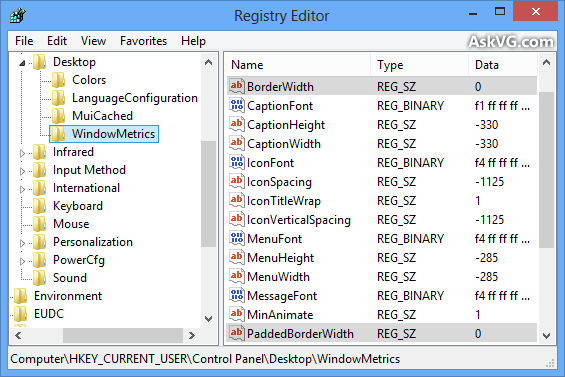
1. Press "WIN+R" key combination to launch RUN dialog box then type Regedit and press Enter. It'll open Registry Editor and go to the following key:
HKEY_CURRENT_USER\Control Panel\Desktop\WindowMetrics
2. In right-side pane, look for following 2 Strings:
- BorderWidth
- PaddedBorderWidth
These 2 strings store the border size and padding settings which you used to customize using advanced appearance settings option in previous Windows versions.
By default, BorderWidth string is set to -15 and PaddedBorderWidth is set to -60.
3. Double-click and change the values of both strings BorderWidth and PaddedBorderWidthto 0 as shown in following screenshot:

You can play around with the values to control window border size and padding.
4. That's it. Close Registry Editor and restart Windows to take effect. After reboot, you'll get thin borders in Windows 8.
PS: If you want to restore default borders, simply change both string values to the default i.e.-15 for BorderWidth and -60 for PaddedBorderWidth.
Comments
0 comments
Please sign in to leave a comment.